Crafting fridge magnets out of polymer clay is a fun, easy, and creative project anyone can try.
Both kids and adults will enjoy shaping little designs, baking them, and seeing their creations come to life as practical magnets for the kitchen.
With just a few tools and some imagination, you can turn a handful of clay into colorful, one-of-a-kind decorations for your fridge.
Because polymer clay is oven-bake, it’s simple to use, and the possibilities are endless. If working with children, make sure an adult handles the baking step while practicing proper safety measures.
Why Polymer Clay Magnets Are Perfect for Beginners
- Kid-Friendly – Polymer clay is soft and easy to shape, making it accessible for kids and beginners. Air-dry clay can also be used if baking isn’t an option.
- Creative Freedom – From animals and fruits to letters and abstract shapes, you can make almost any design you imagine.
- Simple to Make at Home – Polymer clay bakes in a regular or toaster oven, making it one of the most convenient mediums for DIY crafts.
This project is perfect for an afternoon activity, rainy-day craft, or even as a personalized gift idea.
Supplies You’ll Need
- Polymer clay (such as Sculpey Premo)
- Magnets (regular, mini, or self-adhesive – stronger ones work best)
- Super glue
- Toaster oven (or oven safe for clay)
- Optional gloss finish like Mod Podge or a clear acrylic varnish
- Sculpting tools (a toothpick, a smooth glass, or a basic clay tool kit)
💡 Tip: Even if you don’t own professional tools, household items like butter knives, straws, or old toothbrushes can add texture and shape to your clay.
Step 1: Set Up Your Workspace
Start by preparing a clean, flat area to work on. A piece of plexiglass, a glazed tile, or a silicone mat works perfectly because the clay won’t stick. If you’re crafting with kids, give them just a few blocks of clay each to keep the projects manageable in size.
Choose your clay colors ahead of time and cut off only what you need. This helps prevent wasting material and keeps the designs small enough to fit comfortably on a magnet.
Step 2: Sculpt Your Designs
Now comes the fun part—sculpting! Flatten the clay slightly, as thin and lightweight designs work best for magnets. You can roll small balls, shape coils, or press the clay into flat slabs before cutting out shapes.
Encourage kids to experiment with animals, food-inspired items, or seasonal themes like pumpkins or snowflakes. Use toothpicks or carving tools to press in details and textures. Just be sure that all clay pieces are firmly pressed together before baking.
👉 Pro Tip: Make sure your design is larger than the magnet you’ll attach. Place the magnet behind the clay before baking to check sizing.
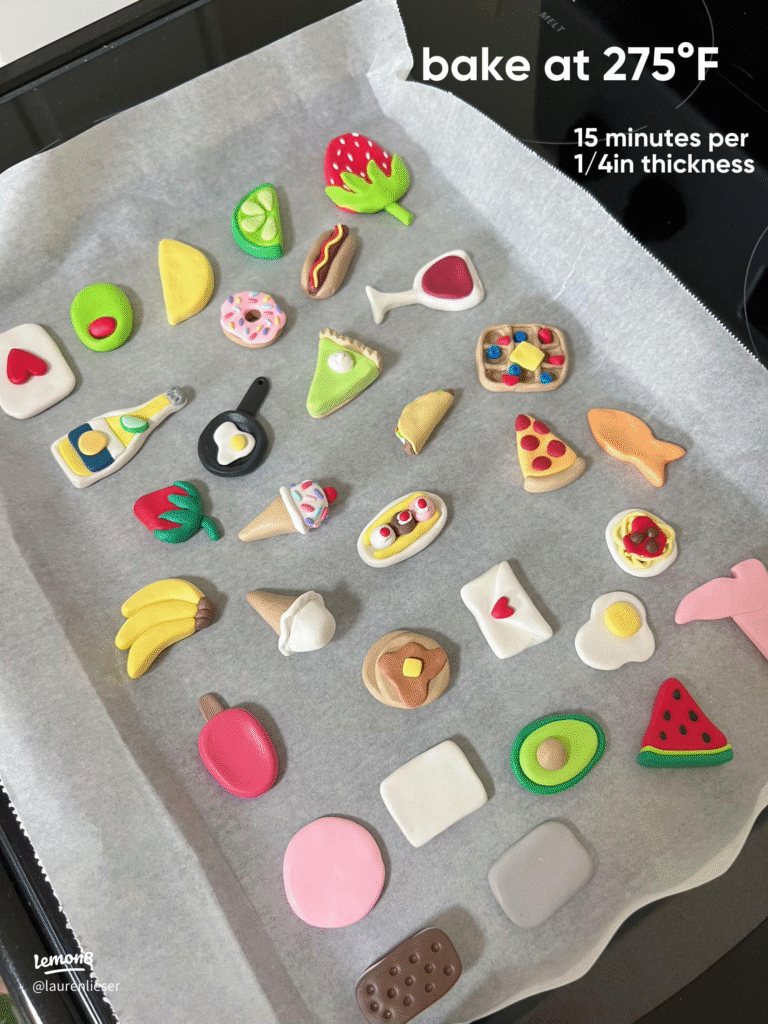
Step 3: Bake Your Clay
Place your finished clay shapes on a baking sheet lined with parchment paper. Bake at 275°F (135°C) for about 30 minutes per 1/4 inch of thickness. Always follow the instructions on the package of your chosen brand.
A toaster oven works wonderfully for small projects, but if you’re using a standard oven, double-check the temperature with a thermometer. Uneven heat can cause cracking, so slow, steady baking is key.
Step 4: Add Gloss (Optional)
Once your magnets are fully baked and cooled, you can leave them matte or give them a polished finish. Use a clear gloss like Mod Podge, Varathane, or Sculpey’s glaze for a shiny effect. Some even come with glitter, which adds an extra playful touch.
Applying a thin coat also protects the surface from scratches and makes your designs last longer.
Step 5: Attach the Magnets
Using super glue, attach one or two magnets to the back of your clay design. If the sculpture is larger, two magnets will help it stick firmly to the fridge without sliding. Press gently and allow the glue to cure completely before testing.
Now your magnets are ready to display or gift!
Extra Tips for Success
- Sketch your idea before starting—it keeps designs simple and focused.
- Always work with clean hands to avoid smudges or unwanted color mixing.
- A damp cloth with rubbing alcohol can clean your surface between colors.
- Start small; thin designs stick better than thick, heavy ones.
- Simple tools like a rolling glass or a toothpick can go a long way for detail work.
Final Thoughts
DIY polymer clay fridge magnets are a simple yet rewarding craft project for all ages. They allow you to explore sculpting, experiment with colors, and end up with something practical and fun. Whether you’re making a rainbow set for your kitchen or letting kids design their favorite animals, each magnet tells a story of creativity.
With just a bit of clay, a magnet, and some imagination, you’ll have a fridge covered in your own handmade art.