Whether you’re heading to brunch, work, or a weekend getaway, the French braid is a classic go-to that adds instant polish to any look.
Mastering this iconic style may seem tricky at first, but with the right tools, preparation, and technique, you’ll soon be braiding like a pro—right from the comfort of your own mirror. Let’s walk through everything you need to know to start French braiding your own hair.
Essential Tools to Set Yourself Up for Braiding Success
Detangling Tools: Brushes and Combs
Before you begin braiding, your hair needs to be smooth and manageable. A good detangling session sets the foundation for a neat, clean braid. For this, you’ll want either a wide-tooth comb or a high-quality paddle brush. The right choice often depends on your hair type.
If your hair is thick, curly, or coily, a wide-tooth comb will gently work through knots without snapping strands. For fine or straight hair, a paddle brush distributes natural oils and reduces frizz, making your hair more braid-ready. Always detangle starting from the ends and move upward in sections to reduce breakage and discomfort.
Hair Ties That Work With You, Not Against You
Once your braid is complete, you’ll need to secure it—this is where choosing the right hair ties makes all the difference. Avoid basic rubber bands that tug and tangle. Instead, opt for soft elastics, especially those with fabric covering or spiral designs. These options hold your braid in place while being gentle on your strands.
For a sleeker finish, clear mini elastics are ideal, especially if you’re styling for a formal occasion. They’re practically invisible and give your braid a neat look. Just take care when removing them—snapping them out could damage your hair, so always unwind them gently.
Bobby Pins: The Secret Weapon
Bobby pins are a braider’s best friend, especially for tidying up loose strands or pinning the braid into a half-up style or bun. Use them strategically to lock in flyaways or to shape the braid against your head for added structure.
For a flawless look, pick bobby pins that match your hair color. You can even spritz them with hairspray before use for a stronger hold. Cross them in an “X” shape for maximum grip—this works especially well for thicker hair or layered styles.
Optional Styling Sprays
While not mandatory, lightweight styling sprays can give your braid a serious boost in terms of hold and style longevity. A mist of flexible-hold hairspray or a texturizing spray will tame frizz and help the braid maintain shape throughout the day.
Texturizing products also add grip, which is especially helpful for freshly washed or very fine hair. Mist lightly from a distance to avoid stiffness, focusing on the braid itself and the crown where flyaways often pop up.
Mirror Setup: Seeing the Full Picture
Braiding your own hair means mastering the art of mirror angles. A standard bathroom mirror often isn’t enough. Add a handheld mirror—or better yet, a second mirror positioned behind you—to get a full view of the back of your head.
You can also set up two mirrors at right angles to each other to create a panoramic reflection. This extra visibility makes it easier to part evenly, braid neatly, and catch any missed sections along the way.
Prepping Your Hair for a Smooth Braiding Experience
Is Freshly Washed Hair the Best?
While it may seem like clean hair would be best for braiding, the truth is: second-day hair often works even better. Hair that hasn’t just been washed tends to have more natural grip and texture, which helps the braid hold its shape.
If you’re working with freshly washed hair, use a lightweight conditioner and rinse thoroughly to avoid slipperiness. A bit of dry shampoo or texturizing spray can restore that all-important grip. This creates the perfect canvas for a braid that lasts.
Taming Knots the Right Way
Tangled hair is a braiding nightmare. Before you even think about sectioning, make sure your hair is completely smooth. Use a wide-tooth comb or a detangling brush to work through knots gently, starting at the ends and slowly moving upward.
If you run into stubborn tangles, hold the section above the knot to avoid tugging on the scalp. Take your time—rushing through this part can lead to unnecessary breakage or pain.
Achieving the Ideal Texture
Texture is your best friend when it comes to braiding. If your hair is naturally wavy or thick, you’re already in great shape. But if you’ve got very straight or fine hair, a little styling help can go a long way.
Consider braiding your hair loosely the night before to give it a gentle wave. Or, apply a texturizing mousse or dry shampoo before braiding to add body and prevent slippage. These products create the slight “grit” that keeps your braid secure and voluminous.
Divide and Conquer: Sectioning
Even before you begin braiding, sectioning your hair will make the entire process easier and more controlled. For a classic braid, part your hair down the center and gather a top section from your hairline to your crown.
Clip the rest of your hair out of the way if needed. Starting with well-defined sections helps you braid evenly and reduces the chance of flyaways. Organized prep makes for a more professional-looking finish.
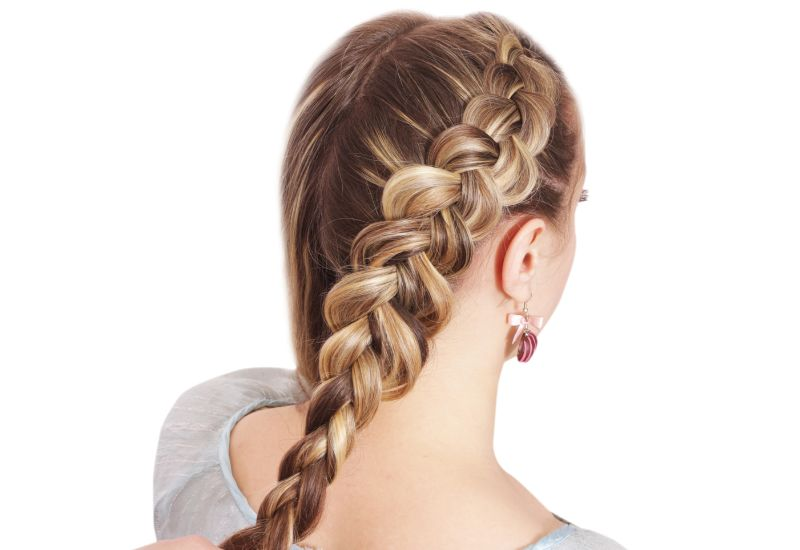
The Basic French Braiding Technique—Broken Down Step-by-Step
Start at the Crown
Begin with a triangle-shaped section of hair at the top of your head, right at the crown. Divide this section into three equal strands—these will be the starting point of your braid.
It’s important to start at the crown because this allows you to draw in hair as you move downward, creating the signature “woven into the scalp” look of a French braid. Keep these strands taut and separated with your fingers.
Add Hair With Each Cross
Begin the braid by crossing the right section over the middle, then the left over the new middle strand. Now comes the French twist: each time you cross a side over the middle, add a small bit of loose hair from that side of your head to the section before crossing.
This “feed-in” technique is what makes the French braid unique. Continue the pattern, alternating sides and adding hair as you go. Work slowly at first to stay organized.
Keep the Tension Steady
The secret to a braid that holds its shape is consistent tension. You don’t want it too tight, but too loose and the braid may unravel quickly. Aim for snug and secure, especially around the crown and sides where the braid lays flat.
Use your fingertips to press gently against your scalp as you braid. This helps you maintain control and avoid unwanted lumps or uneven spacing.
Finish With a Standard Braid
Once you’ve incorporated all your hair—usually around the nape of your neck—continue with a regular three-strand braid until you reach the ends. Secure the bottom with an elastic, making sure it’s tight enough to hold but not so tight that it causes breakage.
To add volume, you can pancake the braid—gently tug at the edges to loosen and widen each loop. Finish with a light mist of hairspray if desired.
Tips for Perfecting Your Technique
Try on Different Hair Types
Practicing on different textures will make you a more versatile braider. Fine hair may need more product for grip, while thick or curly hair might require a bit of smoothing before you begin. The more textures you try, the better your hands will learn how to adjust.
Consider working on a mannequin head if you’re learning solo, or invite a friend with a different hair type over for a braid session. Each experience builds your skill.
Mind Your Braid Tension
One common beginner mistake is pulling too tightly or too loosely. If your braid feels like it’s yanking your scalp, it’s too tight. If it sags or gaps appear, you may need to hold your strands closer to the scalp.
As you practice, you’ll develop a feel for what “just right” tension feels like. When in doubt, opt for moderate tension, and tweak from there.
Clean Up Loose Sections
French braids should look intentional and tidy—even when styled loose. Use your fingers or a tail comb to guide stray hairs into place as you go. Keep a few bobby pins handy for quick fixes.
To tame flyaways, rub a tiny bit of pomade or hairspray between your palms and smooth it over your braid without making it crunchy.
Troubleshoot and Adjust
Still struggling? Here are some quick fixes:
- Uneven braid: Recheck your section sizes.
- Slipping strands: Add more product or start with second-day hair.
- Messy sides: Use a mirror to keep a closer eye on both sides as you braid.
- Tired arms: Take breaks or try braiding in a seated position.
Creative French Braid Variations to Try
The Romantic Side Braid
Shift the braid to one side for a soft, bohemian vibe. Start near your temple and guide the braid diagonally across your head. This works especially well for longer hair and pairs beautifully with floral pins or clips.
Double Braids (Pigtail Style)
Divide your hair into two equal sections and braid each side separately. This sporty look is great for keeping hair off your face and looks amazing on all hair types. Tightly woven versions hold up well through workouts or a day at the beach.
Braid Into a Bun
Braid your hair from the crown down, then twist the remaining length into a low or high bun. Secure with bobby pins. This combo of structure and elegance is perfect for weddings, work, or dressy nights out.
Try a Dutch Braid
Ready to switch it up? A Dutch braid is the inside-out version of a French braid. Instead of crossing over, you cross the strands underneath, creating a raised, 3D braid that stands out more dramatically.
Embrace the Journey and Make It Your Own
Learning to French braid your own hair is a journey of trial, error, and eventual mastery. The more you practice, the more confident you’ll become. Whether you’re perfecting a classic center braid or trying a Dutch braid into a bun, each version lets you express your style and skill.
Braiding is more than technique—it’s an empowering way to engage with your personal beauty and creativity. So arm yourself with your comb, elastics, and a bit of patience, and start practicing. With time, your hands will move intuitively, and your mirror will reflect a braid that’s uniquely you.